Pages

Saturday, June 28, 2014

Vintage Black Gold Tutorial

Hey guys!

So here lately I've gone on a "let's clean out everything in my closet" binge and surprisingly enough, that included my makeup. I pretty much got rid of about 50% of my makeup (maybe a little less, but it was a lot). While going through my makeup, one thing lead to another and I started swatching things and eventually realized I was in the mood to do a full face with some rediscovered products I found in the black hole area of my makeup drawers. I wanted to use some of my older products. but also incorporate a few new things. I decided to create a look around the Stila Magnificent Metals Foil Finish Eyeshadow in Vintage Black Gold. I've heard a lot of mixed reviews on these pigments and I wanted to share with you a little of what I've learned about the application process. I will explain more in detail in the tutorial below. I hope you all enjoy this look and get inspired! 


Apply your favorite primer first. I used MAC's Paint Pot in Soft Ochre. Next, apply a transition shade a few shades darker than your natural skin tone. I used Naked from the original UD Naked palette.


Next, take a dark black shade and create a sideways V shade in the outer corner of your lid. This will add depth to the look when you later apply the glitter pigment. 


Then, apply a sticky base on the lid from the inner corner to about half way through the black V you created. The glitter should overlap the black slightly. Only apply this sticky base where you want the glitter. If you go up too high (anywhere above your crease) it will look messy and be harder to blend later. 


This glittery pigment is very unique and nothing like anything else I have in my collection. It is slightly squishy and bouncy to the touch kind of like a cream but isn't. It's strange. It comes with a liquid eye primer you are supposed to drop into a small pan and mix with the glitter pigment, then apply it with a synthetic brush across your lid. I honestly don't like the results I get by doing it that way so I came up with my own way to use it. I simply dip my ring finger into the glitter pigment and apply it directly onto my lid. No liquid primer and no mixing crazy, nonsense stuff together. By applying it with your finger, you will get the most color payoff and your lids will look AWESOME!


Now that you've applied the glitter, take a slightly darker transition shade and rock it back and forth into your socket/crease. This will help blend the edges of the glitter and darken the look a tad.


Let's not forget the lower lash line. I ran Sable all the way across the lower lash line, Espresso across 2/3 of the lower lash line and finally Black on the outer 1/3 of the lower lash line and blended.


For highlight, I kept it simple by going with a matte cream color in the inner corner of the eye and underneath the brow. Notice how I am only using matte eyeshadows (other than the obvious glitter we applied). This draws the attention to the glittery goodness on the mobile lid and doesn't overwhelm the look with too much shimmer and glitter. 


Last, finish with a coat of mascara and some wispy lashes. I love these by Ardell. 


And here's the final look.


I hope you enjoyed this look! Let me know what you think in the comments below :) Also, if you recreate this look, tag me in your picture on Instagram. I'd love to see what you come up with!

Product List:

Hourglass Veil Mineral Primer SPF 15
Laura Mercer Silk Creme Foudation in Beige Ivory
Chanel Soleil Tan De Chanel Bronze Universel
ELF Studio HD Blush in Headliner
Maybelline Instant Age Rewind Concealer in Neutralizer
Covergirl Ready, Set, Gorgeous Powder Foundation in 105/110
Tarte Amazonian Clay Blush in Glisten
Benefit Hoola Bronzer
Anastasia Beverly Hills Dip Brow Pomade in Dark Brown
MAC Paint Pot in Soft Ochre
Urban Decay Naked Palette
Lorac Pro Palette
LA Splash Splash Proof Sealer Eyeshadow Base
L'Oreal Voluminous Carbon Black Mascara
Ardell Demi's in 120 Black
Nivea Lip Butter in Vanilla and Macadamia Kiss
Revlon Super Lustrous Lipstick in 415 Pink in the Afternoon


Earrings are from Old Navy.



Sunday, June 22, 2014

Work Style Inspiration

Hey guys!

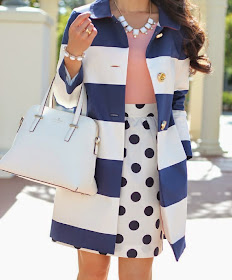
As some of you may know, I graduated college in May with a major in Interdisciplinary Studies (Elementary Education Early Childhood - 6th grade).  I will start my first year of teaching in the Fall and am super excited! I have already starting coming up with ideas of how I want to decorate my classroom and also how I want my work wardrobe. Think KATE SPADE. I am really into Kate Spade lately and would like to carry that sense of style over into my classroom and into my wardrobe. I love the feminine, timeless prints with pops of colors. I have been especially loving polkas dots, gingham, leopard, pink, gold, and black and white. These prints and colors lift my mood and make me feel good (it's funny how prints and colors can do that). That's exactly why I want to surround myself with things I think are pretty. I always want to be in a good mood and be the best I can be when it comes to my future students.

So lately, I've took to Pinterest, as one does for inspiration, and have found quite a few outfits I think would be perfect for work while still incorporating the Kate Spade look I'm going for. I have picked out some of my favorite looks and just wanted to share them with you. I hope you find a little inspiration yourself while looking through these beautiful and fun pictures. Remember, work clothes don't have to be boring. Make your outfit YOU. When you look good, you feel good.


All the images are linked back to Pinterest. Feel free to follow me while you're there- thousands of others are ;P

What outfits were your favorite? What inspires you?


Sunday, June 15, 2014

How to Shop for Department Makeup


Hey guys!

I've wanted to do this post for a while and I've finally gotten around to doing it. If you're new to makeup, want to venture out into the luxury lines of makeup, or just simply have a hard time deciding on which products to try, hopefully this post will help shed some light on a few things.

First, I want to start by saying that I used to work behind a makeup counter and know that a lot of people are intimidated when they see rows and rows of products they haven't the slightest idea about. I know when venturing into an unfamiliar makeup line/brand it can be daunting and many times frustrating because you aren't sure which products are right for you and your skin type.

I will list some key points to keep in mind before, during, and after shopping for makeup at a department store.

1. What are you Looking for?

Go through your makeup drawers and figure out what makeup you want to purchase. Throw away old makeup you've had for a little too long and reassess the makeup you have. Look over the products that you really like and think about why you really like them. Are they long lasting, give your skin a glowing sheen, convenient to use, or suit your skin tone the best? Keep these things in mind when you begin your makeup shopping.

2. Know your Skin Type.

It is extremely important to know what type of skin you have and what your skin needs are. Are you excessively oily, extremely dry, have combo skin, or maybe just oily around the T-Zone area? You need to know how your skin behaves on a day-to-day basis so you have a better idea as to what to look for while you're shopping. Also keep in mind the time of year it is. Typically, we get oilier during the hotter seasons and drier during the cooler months. This means you may need to look for a foundation that may be targeted towards shine control or possibly one that is more moisturizing on the skin. You may also need to add a primer or moisturizer to your daily routine if you don't use one already.

3. Create a Budget.

When going shopping for high-end products, expect to pay the high-end price tag. Don't have unrealistic ideas of what things "should cost." Remember, these are high-end LUXURY items a.k.a. things you can't pick up at Walgreens or Walmart. Expect to pay at least $30-$60+ for a single foundation, or $10- $40 for a single eyeshadow. Come up with a realistic budget and stick to it. It may be a good idea to leave the credit cards at home and just carry cash, that way you don't go over your budget.

Tip: Make a shopping list. After determining the items you want, write them down (or type the list in your phone) so you don't forget or get side-tracked when shopping.

4. Do your Research.

Now that you have an idea as to what makeup you want to buy, I suggest doing a little research. There are thousands of reviews of products all over the internet- use them to your advantage. My "Go To" places for researching makeup products are Youtube, MakeupAlley, Sephora (depending on the brand), Google, other beauty blogs, or the makeup brand's website. You can find millions of opinions of certain brands and items.

Tip: Keep in mind that everyone has a different opinion. What may work for someone else may not work for you, or vice versa. The only way to truly know is to try out the product for yourself. (More on that later…)

5. Create a Plan.

After you've written down your list of items and done a little research, now figure out your plan of action. Figure out what stores sell the items you want. Then, decide where you would like to shop. Many times places like Sephora, Ulta, Macy's, Dillard's, or similar stores have an overwhelming amount of makeup and a ton of different brands to choose from. Don't be intimidated. This is what you've prepared for. When shopping, be confident and don't let the beauty consultants intimidate you or pressure you into buying things you hadn't planned on buying. It would also be good to go shopping by yourself. Sometimes our peer pressuring friends can get us side tracked and we may lose our focus or spend more money than we had intended. :) Remember what you came for and stick to your plan.

6. Look Around and Ask Questions.

When you get to where you're going, I would suggest looking around first and then asking the beauty consultant questions about the few products you had on your list to see what they say. Many times they have a little more insight about products and can give you more detail about what the products are really like. Also, use the testers they have out on display so you can play with the product to see how it looks and feels on your skin. A few things to keep in mind of the products are the texture, finish, and color.

7. Sample and Buy.

If you are on the fence with some of the items ask for a sample to try. They should be more than willing to provide you with a sample if possible. Keep in mind that sometimes you won't be able to take home certain items to sample such as mascara. If you know you have sensitive skin definitely ask for samples. Also ask about their return policy. There's nothing worse than spending hundreds of dollars on products that aren't right for your skin and not being able to return them. Then, after you've had all your questions answered and feel comfortable, make the move. Grab the items you want and go check out.

And there you have it. I know it may seem like a lot at first, but it's really not when you get into the habit of following the steps every time. And really, when you learn what works with your skin and learn what products typically work for you, you'll be able to cut to the chase and skip half of these steps. I really hope this helped some of you. I know when some people are venturing into the world of luxury makeup it can be pretty overwhelming. Trust me, I've been there.

Have fun makeup shopping! You got it girl!


Do you have any tips to share while your shopping for makeup? I'd love to hear them! 


Disclaimer: I will not be held responsible for any makeup shopping addictions started by using these steps. :P